Home » Apple Butter with Brown Butter
Apple butter spread on a slice of seeded bread next to apple wedges

Apple Butter with Brown Butter

Smooth, deeply flavored, and easy to make, this apple butter recipe turns a few ordinary apples into something truly special: a silky spread that reminds me a little of tarte Tatin.

My version uses just a small amount of brown butter. It adds toasted, nutty notes that work beautifully with the concentrated flavor of the apples, without making the spread heavy or masking the fruit.

Fall, when apples are at their best, is the perfect time to make your first batch. No slow cooker needed: it all happens right on the stovetop. But I come back to this recipe all year long, whenever a few apples in my fruit bowl start to lose their crunch.

Published on September 25, 2026

4.9 from 28 votes

PREP TIME

10 min

COOK TIME

1½–2 hrs

DIFFICULTY

Easy

TEXTURE

Spreadable

Apple butter may feel quintessentially North American today, but its roots run deep in Europe.

Long before it became a fall staple in the United States and Canada, people in several parts of Europe were already cooking apples and pears down into thick, concentrated spreads. You can still taste that tradition in Rhineland Apfelkraut, Dutch appelstroop, and Belgian sirop de Liège.

European immigrants brought these fruit-preserving traditions with them to North America, where apple butter took root and, unlike in much of Western Europe, never went out of style.

I find that twist of history fascinating. When I was growing up in France, apple butter was never on our table, yet here in North America, it’s still very much a part of fall.

So with this version, I’m reconnecting with those European roots, with a little help from one of my favorite pastry techniques: brown butter.

And although cinnamon is a classic with apples in North American baking (and often finds its way into apple butter, too), I leave it out on purpose. I want the apples and the toasty, nutty brown butter to be the stars here.

What Brown Butter Adds to Apple Butter

Despite its name, traditional apple butter doesn’t usually contain any butter. The name comes from its smooth, thick, spreadable texture.

Mine does, but only a touch: I use just 1½ tablespoon of butter for 2.2 lb of apples, so it still tastes first and foremost like apples.

Why It Works So Well

As butter browns, the milk solids toast and develop a warm, nutty aroma.

That flavor works particularly well with long-simmered apples, whose natural sugars become more concentrated as they cook. The brown butter adds depth, but the fruit still shines through.

How to Make Brown Butter

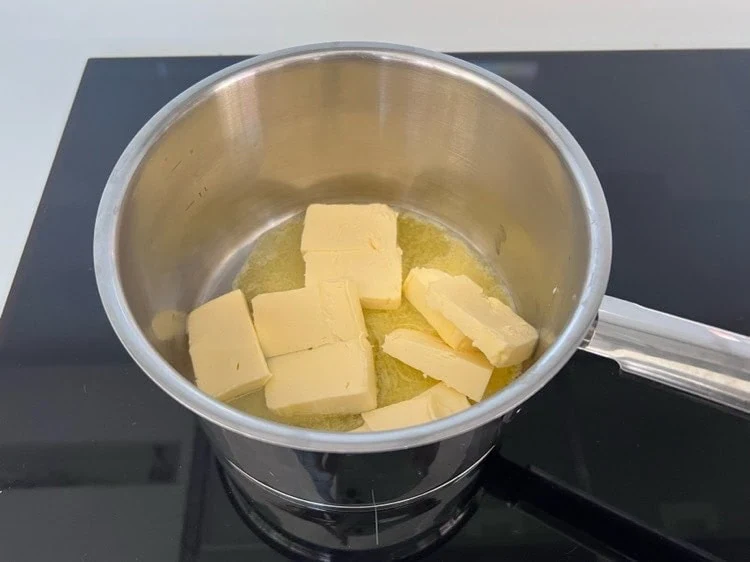
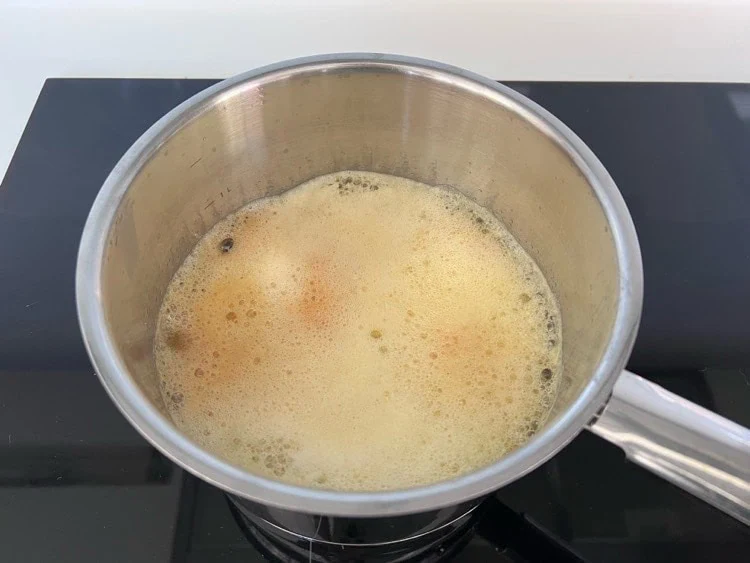
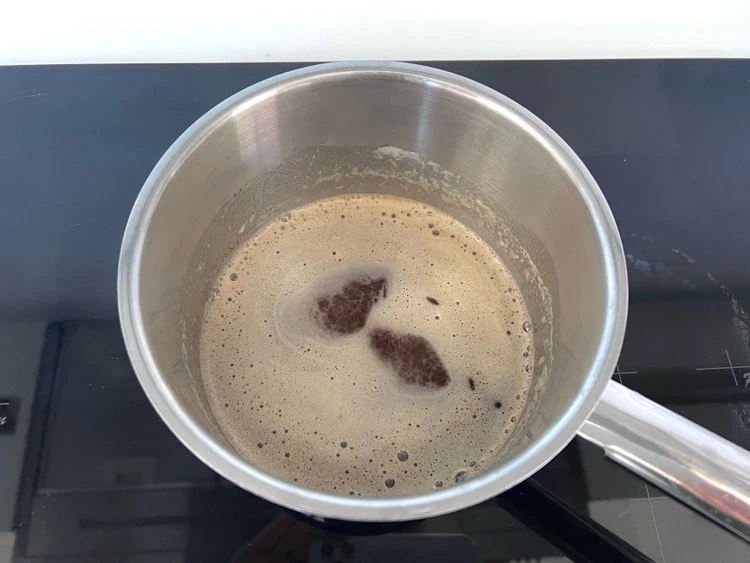
Melt the butter in a small, light-colored saucepan over medium-low heat (stainless steel is ideal, since it lets you see the color change).

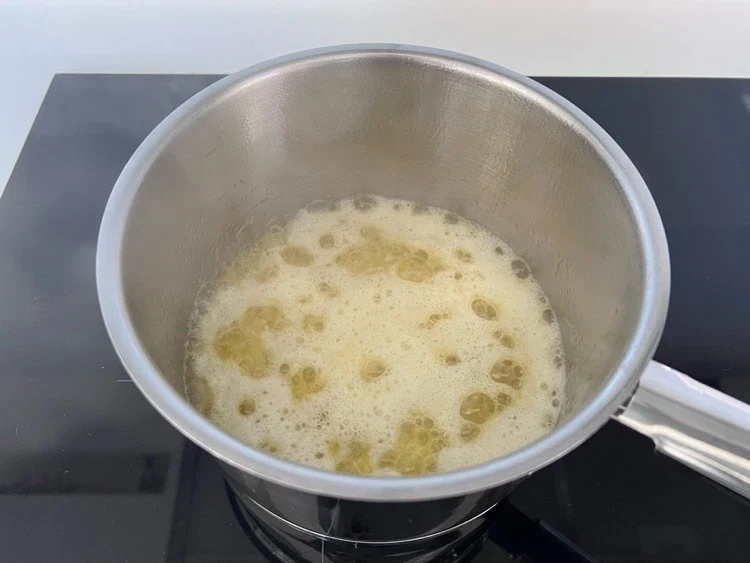
It will foam and sizzle at first, then gradually quiet down. Watch the bottom of the pan carefully: as soon as you see small brown flecks and the butter smells nutty, remove it from the heat.

Brown butter can go from perfectly toasted to burnt in seconds, so don’t walk away once it starts to change color.

Never made brown butter before? The photos below walk you through each stage:

Want another way to use brown butter? Take a look at my passion fruit financiers, inspired by pastry chef Pierre Hermé (the English version is coming soon).

Which Apples Work Best?

Good news: you don’t need any special variety to make great apple butter.

What matters most is using flavorful apples that are ripe and naturally sweet. The sweeter the apples, the less maple syrup or sugar you’ll need to add.

Sweet varieties like Golden Delicious, Gala, and Fuji soften easily as they cook. For a bit more depth, add a Jonagold or a Braeburn: their gentle tartness balances the sweetness without making the apple butter sour. Combining varieties like this usually gives a more complex, well-rounded result.

And if you can find McIntosh (a Canadian classic that’s also popular in the Northeast), reach for it: this tart, tender apple melts down beautifully into apple butter.

When I use organic apples, I leave the skins on (after a good wash). Once the apples have cooked down and been blended until smooth, you’ll barely notice them.

Don’t have maple syrup on hand? Use the same weight of brown sugar or muscovado sugar instead: about 3 tablespoons packed. Taste before adding more, since how much you need really depends on your apples.

How to Make Apple Butter Thick and Spreadable

Close-up of smooth apple butter on seeded toast next to a fresh apple slice

What really separates apple butter from applesauce is the cooking. The apples need enough time not just to soften, but to lose much of their water.

That’s why the cooking time in the recipe is a guideline, not a hard-and-fast rule: some apples are much juicier than others.

First, cook the apples until they’re completely soft and starting to fall apart. Then blend them and take a good look at the texture. If it still looks like applesauce, keep cooking it uncovered over low heat. Stir often, especially as it thickens, since it’s more likely to stick to the bottom of the pan. Careful, too: thick apple butter tends to bubble and splatter, so a long-handled spatula comes in handy.

To check whether it’s ready, drag a spatula across the bottom of the pan. If the path stays clear for a few seconds before slowly filling back in, your apple butter is thick enough.

And remember, it will thicken a little more as it cools.

How to Serve Apple Butter

The simplest way to enjoy apple butter is also one of my favorites: spread on lightly toasted bread or brioche, for breakfast or for le goûter, the French after-school snack.

But don’t stop there. Try it:

  • on pancakes, waffles, or crepes
  • spooned over yogurt
  • spread over the bottom of an apple tart shell before arranging the sliced apples
  • with an aged cheese like Comté or a sharp cheddar

It also makes a lovely addition to a fall breakfast or brunch.

Hélène Thiers

Made It, or Tempted?

4.9 from 28 votes

I’d love to hear what you think!
Just click the stars above to rate the recipe.

It only takes a second, and it helps other home cooks find recipes they’ll love.

Homemade Apple Butter with Brown Butter

Recipe by Hélène Thiers
4.9 from 28 votes

Smooth homemade apple butter made on the stovetop, with the deep flavor of long-simmered apples and subtle toasted notes from brown butter. Makes about 1¾ cups.

Course: Snack, BreakfastCuisine: French-inspired, North AmericanDifficulty: Easy
Servings

10

servings
Prep time

10

minutes
Cook time

2

hours 
Cook mode

Pour garder la recette visible pendant que je cuisine

Ingredients

  • 2.2 lb apples

  • 2 tablespoons maple syrup, or brown or muscovado sugar (3 tablespoons, packed), plus more to taste

  • 1 1/2 tablespoons unsalted butter

  • 1 pinch salt

  • 2 tablespoons water

Instructions

  • Prepare the apples.
    Wash the apples thoroughly. Peel them if you like, then core them and cut them into chunks.Cored apple chunks with the skin on, ready to cook
  • Combine the ingredients.
    Put the apples in a heavy-bottomed saucepan with the maple syrup (or sugar), salt, and 2 tablespoons of water.Apple chunks in a saucepan before cooking
  • Simmer.
    Cover and cook over low heat for 1½ to 2 hours, stirring regularly. If the apples start to stick before they’re completely soft, add a splash of water.
    By the end, they should be very tender and falling apart.
  • Make the brown butter.
    Toward the end of the cooking time, melt the butter in a small saucepan over medium-low heat. Keep cooking until it turns amber, small brown flecks form on the bottom of the pan, and it smells nutty. Remove from the heat immediately.
  • Blend.
    Add the brown butter to the apples, along with all the little brown bits. Blend with an immersion blender until completely smooth. (If you’re using a countertop blender, let the mixture cool slightly first and don’t fill it more than halfway.)
  • Adjust the consistency.
    If the apple butter is still too thin, put it back over low heat and keep cooking, uncovered, stirring often.Blended apple butter being stirred with a spatula as it thickens
  • Check the consistency.
    Drag a spatula across the bottom of the pan. If the path stays clear for a few seconds before slowly filling back in, it’s ready. Keep in mind that it will thicken slightly as it cools.Spatula trail across the bottom of the pan showing the apple butter is thick enough
  • Taste and adjust.
    Add a little more maple syrup or sugar if needed.
    If you add sugar at this stage, cook for another minute or two, stirring, until it has completely dissolved.
  • Cool and store.
    Transfer the apple butter to a clean jar.
    Let it cool completely, then cover and refrigerate for up to 1 week.

La p'tite astuce Minute Papillote

  • Don’t leave the little brown flecks behind in the saucepan: scrape them into the apples with a spatula. That’s where all the nutty flavor is!

Frequently Asked Questions

Can I Add Cinnamon?

Absolutely! Cinnamon is a classic in North American apple butter, so feel free to add it if you like a more traditional spiced version.

Start with ½ teaspoon, added along with the brown butter before blending, then adjust to taste.

I leave it out here so the apples and the nutty brown butter can take center stage.

Not necessarily.

When I use organic apples, I usually leave them unpeeled after washing them thoroughly. After the long cooking and blending, you’ll barely notice the skins.

If your apples have particularly thick or tough skins, peeling them will give you a smoother result.

It most likely just needs a little more time on the stove.

The water content of apples varies a lot from one variety to another, and even from batch to batch.

Keep cooking the apple butter uncovered over low heat, stirring regularly, until more moisture has evaporated.

To check the consistency, drag a spatula across the bottom of the pan. The apple butter is ready when the path stays clear for a few seconds before slowly filling back in.

Keep in mind that it will also thicken slightly as it cools.

Stored in a clean, airtight jar in the refrigerator, it keeps for about 1 week. Always use a clean spoon to serve it.

For longer storage, freeze it in small portions for up to 3 months. Thaw it in the refrigerator and give it a stir before serving.

This recipe is meant for the fridge or freezer.

I haven’t tested it for water-bath canning, so I don’t recommend it for shelf-stable storage.

More Homemade Spreads and Breads

I’m still adapting these recipes into English. In the meantime, feel free to explore the original French versions.

Rustic fig and hazelnut bread, sliced open

Fig and Hazelnut Bread

A rustic Dutch oven bread with figs and hazelnuts, delicious lightly toasted and spread with apple butter.

Jar of homemade chestnut cream labeled “Fait avec cœur à Singapour,” with a spoon

Chestnut Spread (Crème de Marrons)

A lower-sugar take on the classic French chestnut spread, for fall breakfasts and desserts.

Salted butter caramel sauce pouring into a glass jar

Salted Butter Caramel Sauce

A creamy caramel with salted butter and a touch of fleur de sel.

Orange marmalade on a slice of toasted bread

Orange Marmalade

A full-flavored marmalade that makes the most of the whole fruit.

Leave a Comment

Your email address will not be published. Required fields are marked *

*

This site uses Akismet to reduce spam. Learn how your comment data is processed.